How to add Proto AI Commerce in Google Tag Manager
How to add Proto AI Commerce for Google Tag Manager
- What is a tag?
- What is an account?
- What is a container?
Tags are segments of code provided by analytics, marketing, and support vendors to help you integrate their products into your websites or mobile apps. With Google Tag Manager, you no longer need to add these tags directly to your projects. Instead, you configure and publish tags and how they fire from within the Tag Manager user interface.
A Tag Manager account represents the topmost level of organization. Typically, only one account is needed per company. A Tag Manager account contains one or more containers.
A container consists of multiple tags and rules to govern them. There are specific container types that may be used for:
- Websites
- AMP pages
- Android apps
- iOS apps
- Running Tag Manager on a server
Create a new account and container
- In Tag Manager, click the Accounts tab > Create account.
- Enter an Account Name and select the country for the account.
- Enter a descriptive Container name and select the container type.
- To create your container, click Create and agree to the Terms of Service.

Result
When your new container first loads, you will see a different dialog depending on the type of container.
- Web and AMP: You receive the installation code snippet for your website.
- iOS and Android: You receive a link to the developer documentation.
- Server: You can choose from provisioning a server automatically or manually.

Install the container
- In Tag Manager, click Workspace.
- Near the top of the window, find your container ID, formatted as “GTM-XXXXXX“.
- Click your container ID to launch the Install Tag Manager box.
- Copy and paste the code snippets into your website as instructed in the Install Tag Manager box.
- Place the
<script>
code snippet in the<head>
of your web page’s HTML output, preferably as close to the opening<head>
tag as possible, but below any dataLayer declarations. - Place the
<noscript>
code snippet immediately after the<body>
tag in your HTML output.
- Place the
Add tags
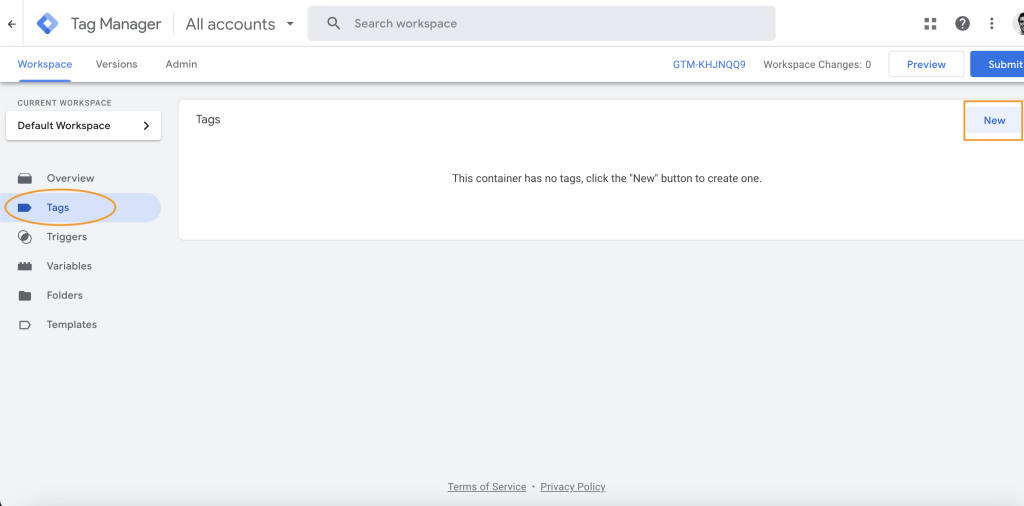
- In your Workspace, click Tags.
- To add a tag, click New.
- Name your tag and configure it:
- Tag Configuration: Choose the type of tag you want to manage. Google Tag Manager supports tags for Google products and third party tags. If you need more help with setting up a tag from a Google product, refer to Your guide to Google Tag Manager. If no tag type matches, you can create a custom HTML or image tag.
- Triggering: Triggers govern if a page tag is fired or blocked. Learn more about triggers
- Optional: Add a note to your configuration for later reference. To add a note, click the more actions
menu and select Show Notes
- Click Save and create more tags as needed.

Verify that your tags work
- Click the Preview button. Google Tag Assistant launches in a new tab.
- Enter the website URL on which you installed the Tag Manager container. If there are any errors, start debugging with the Tag Assistant.
- To edit a tag, click on a tag name to change its settings. For example, when a tag gets fired after a page loaded, but you want it to fire if someone clicks a button, update the trigger.
- Save your changed tag and verify that the problem was solved by launching the Preview mode again.
Publish tags
- Click Submit at the top right hand side of the screen. The Submit Changes screen will appear, with options to publish the container and save a version of your container.
- Select Publish and Create Version if it is not already selected.
- Review the Workspace Changes section to see if your configuration appears as you expect.
- Enter a Version Name and Version Description.
- Click Publish.